My Personal Best Configuration To Speed Up Mozilla Firefox


In default Firefox configurations, Mozilla configured Firefox to suite-in on average computer specifications and internet connection speed. Meaning that, either you have a low-end computer with a slow internet connection or mid/high-end computer with a fast internet connection, Firefox will runs well, at the same speed. These setup is too conservative on nowadays computer specs. and internet speed, so, with fast computer and fast internet connection, you can change the configuration setup to get most of what Firefox has, to make it even more faster.

I've been using Mozilla Firefox for a quite some time now, and always trying to find an extra speed of it, of course speed is the major thing when we choose to use any browser, isn't it? After searching through forums, blogs, websites and also from Mozilla Knowledge Base Article, learning and experimenting, here is my best Firefox preferences I'm going to share with you all, I'm stick with these settings even after upgrading Firefox and it work's well and fast.

Want to try it? First, you need to disable or uninstall all add-ons related to speed up Firefox such as FasterFox, FasterFox Lite, etc. and also if you have tuned Firefox using some software like FireTune, please restore to the default value. We need to do this, otherwise the add-ons will change back to it configuration after Firefox restart.

Here is the preference values:
HTTP Connection Prefs:

pref("network.http.max-connections", 96);

pref("network.http.max-connections-per-server", 32);

pref("network.http.max-persistent-connections-per-server", 8);

pref("network.http.max-persistent-connections-per-proxy", 16);

Note:
"network.http.max-persistent-connections-per-proxy" is only take effect when browsing through proxy.

HTTP Pipelining Prefs:

pref("network.http.pipelining", true);

pref("network.http.pipelining.ssl", true);

pref("network.http.proxy.pipelining", true);

pref("network.http.pipelining.maxrequests", 8);

Note:
Secure HTTP always enabled whenever "network.http.pipelining" is set to "true", no matter if "network.http.pipelining.ssl" is set on "true" or "false".

Rendering Prefs:

pref("nglayout.initialpaint.delay", 0);

pref("content.notify.backoffcount", 5);

pref("content.notify.ontimer", true);

pref("content.notify.interval", 120000);

pref("content.interrupt.parsing", true);

pref("content.max.tokenizing.time", 360000);

pref("content.switch.threshold", 750000);

Note:
To use "content.max.tokenizing.time" - "content.notify.ontimer" and "content.interrupt.parsing" must be set to "true". The value is, triple the value of "content.notify.interval".
To use "content.notify.backoffcount" - "content.notify.ontimer" must be set to "true" for this preference to take effect.
To use "content.switch.threshold" - "content.notify.ontimer" and "content.interrupt.parsing" must be set to "true".
To use "content.notify.interval" - "content.notify.ontimer" must be set to "true".
You could either change the settings through about:config, you have to add a new value because some of it does not present in default or by editing Firefox "pref.js" file that can be located at:
C:/Users\UserName\AppData\Roaming\Mozilla\Firefox\Profiles\zpkmkczk.default in Windows Vista and 7.

C:/Documents and Settings\UserName\Application Data\Mozilla\Firefox\Profiles\zpkmkczk.default in Windows 2000, XP & Server 2003.
The "zpkmkczk.default" might be named differently from mine but it's the only folder in there. Open it and locate the "pref.js" file, right click on it, choose edit and edit with the above values. Before that, make sure you have exiting all Firefox windows and also please backup the "pref.js" first.

Start Firefox and do a test drive. I hope you can feel the different and also wish you'll like it.

That's it .. thanks for visiting my blog.

How To Backup And Restore The Services Configuration (Startup Type) In Windows


There are hundreds of services that are installed and run in Windows operating system. Changing the settings of these services, such as configuration of Startup Type which determine whether Windows will load and start the services on system starts up, it's extremely improved the system performance related to fast startup, reduced system resource usage (RAM and CPU) and make Windows more responsive if you do it right.

It is best to backup and save the existing start state of all services, which can then be used to quickly restore all services to their original startup state when there is something goes wrong.

Here is two scripts that you can use to backup, restore or also merge the configuration you've made to other computer with the same OS setup.

VBScript

This VBScript that will outputs the Service Startup configuration to a .REG file. The script enumerates the list of Win32 services and their startup state from the following registry key:
HKEY_LOCAL_MACHINE \ SYSTEM \ CurrentControlSet \ Services
The Startup type of all the Win32 services are written to a .REG file, which can then be run to restore or merge into other computers. The REG file will have the prefix Services_Backup_ followed by the current date, and will be saved to the Desktop.


Download Services_Conf_Backup.zip and save to Desktop. Unzip the archive and run the script services_conf_backup.vbs.

Note: You’ll need to restart the target computer after restore or merging the file for changes to take effect.

Batch File

The Services Start State Backup Script that can automatically save the startup state of all Windows Services in the current computer and creates another Batch file containing the SC command-line to change the Startup Type of services with the current start state. This Batch file when run in the target computer, automatically applies the Services startup settings.

The generated back up batch script file will have the name in the form of Services_Day_DD_MM_YYYY_HH_MM.bat to avoid any accidental overwrite when user does multiple export or backup. It can be located at C:\Windows\System32.


Download Services_Start_State_Backup.zip and save to Desktop. Unzip the archive and run the script Services_Start_State_Backup.bat.

Note: You’ll need to restart the target computer after restore or merging the file for changes to take effect.

Those scripts supports Windows XP/2003/Vista/7.

Download Free PC Tools Spyware Doctor With AntiVirus 6 Valid For 3 Months


PC Tools Spyware Doctor With AntiVirus 6 claims to be the finest AntiSpyware + AntiVirus these day. That's what PC Tools common phrase use in every of their promotions.
"All the main antivirus tools now claim to detect spyware along with other threats, but tests show their effectiveness can vary considerably. It's a good idea to install a specialist antispyware tool, then, ready to deliver a second opinion whenever it's required, and PC Tools Spyware Doctor is one of the best".
What the features is in:
  • Recommended by experts and editors around the world.
  • Complete AntiVirus and AntiSpyware capabilities in one application.
  • FREE customer support for all users.
  • Frequent advanced updates ensure that you are always protected.
  • Detects, removes and blocks all types of Spyware, Adware, Viruses, Trojans, Worms, Keyloggers and other threats.
  • Easiest to use with intelligent automatic protection.
You can get this , the whole 3 months full version of Spyware Doctor for free.

1. Visit this promotion page. You will see the page something like below.


2. Click on "Start Download Now!" to download the setup file. That's all you need.

3. Install and enjoy 3 months of full PC Tools Spyware Doctor + AntiVirus 6 protections, no keys required.

Note: To get the smooth performance, PC Tools Spyware Doctor requires a minimum 1GB of RAM. If you have a low-end systems and want to get the protections of Spyware Doctor, please download the following free full version Spyware Doctor 6 Starter Edition.

PC Tools Spyware Doctor 6 Starter Edition is a strip-down version of Spyware Doctor With AntiVirus 6 to make it faster and lighter but, some of the features of course been taken out. It's still got the real-time protections and the good is, it's free.

1. To get it, simply browse to this site, click on "Download now" to download the setup file.


2. Install and use it. No keys required.

Free Kaspersky Antivirus 2010 Genuine License Key Valid For 6 Months


This promotion runs by MSN China and Kaba. Although this offer is just for Chinese people, you can still grab it. I was able to grab it without using any proxy. You can try without any proxy, but if you get errors, try accessing the promo page using any Chinese proxy.

Here's what to do:

1. Go to the promo site HERE. Then, click on the orange button like the screenshot below.


2. Now, you have to sign in using your MSN or Hotmail ID. If you don't have any, please create one.


3. After you sign in, the page will take you back to the promo site and your license key already there waiting for you.


If you a little bit worried about signing in using your MSN ID on some unknown Chinese page, you can just log in on normal Hotmail or MSN or Live page and after that, go to the promo page and you don't need to sign in anymore, just proceed to get the license.

Kaspersky AntiVirus 2010 supports Windows XP SP2 or later / Vista

Note: Does not support Windows 2000.

Read more about KAV 2010 and download the latest version 9.0.0.463 from HERE.

UPDATE:

Seems like this license key only valid for Chinese Simplified version. To use in English version, please follow some tricks from HERE, HERE or HERE.

Download Important Update KB971029 To Disable Autorun In Autoplay For Windows XP, Server 2003 And Vista


Microsoft has released an important update for Windows XP, Windows Server 2003 and Windows Vista yesterday, users are adviced to install this update due to security enhancement.

The update was KB971029 , which will fix a problem with the disable Autorun feature. Without these updates, Autorun for a network drive cannot be disabled. Also, the shortcut menu and double-click functionality of Autorun were not disabled even if the various steps on tweaking been done.

AutoPlay is a function that begins reading from a drive as soon as you insert media into the drive. Therefore, the setup file of programs and the music on audio media start immediately.

Autorun commands are generally stored in Autorun.inf files. These commands enable applications to start, start installation programs, or start other routines. In versions of Windows that are earlier than Windows Vista, when media that contains an Autorun command is inserted, the system automatically executes the program without requiring user intervention. Because code may be executed without user's knowledge or consent, users may want to disable this feature because of security concerns.

In Windows 7, it's already comes with this enhancement in Autorun feature which restricts the Autorun entry to only CD and DVD drives. It helps in keeping your system safe from malware executions, etc.


To get the benefits of it, please download and install this important update from the links below:

Download Update for XP

Download Update for Server 2003

Download Update for Server 2003 (64-bit)

Download Update for Vista

Download Update for Vista (64-bit)

Read the
Knowledge Base Article

How To Find Drivers For Unknown Devices In Windows


Usually, when you buy any hardware, the drivers come along with it on a disc. If you lost the driver disc you can always download the necessary drivers from the manufacturer's website. But what do you do when you are not sure of the manufacturer of the hardware? When you open Device Manager properties, a few device with big yellow question mark listed and labeled as "Unknown Devices".

Besides of using some software's such as Driver Detective, Unknown Device Identifier and so on to trace down the "Unknown Devices" ID and search an appropriate drivers for you through internet, here's the another and easy way to identify also helps you to download the drivers for it.

PCIDatabase.com served a big database of PCI device IDs information about either the vendor itself or the devices manufacture. For that, I ran a test on a device with well installed driver from my PC to see what this site can do and what it can give or it will produce a wrong answers. Here's the test and way to do it.

1. Open Device Manager (Control Panel > System > Hardware > Device Manager) or just right click on My Computer (or Computer in Windows Vista/7) > Properties > Hardware Device Manager (or in Windows Vista/7, just click on Device Manager after Properties).

2. The hardware which drivers are missing will appear as "Unknown Device" and normally with a yellow question mark beside it, so it's easier to locate the device. Right click on the "Unknown Device" and click on Properties.

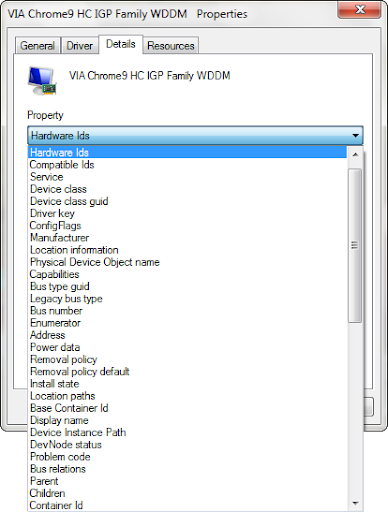
3. Under the Properties window > click on Details tab and select Device Instance Id or Hardware Ids in Windows Vista/7 from the drop down box.


4. You should see a code similar to this (but, in here is my test hardware ID):

PCI\VEN_1106&DEV_3371&SUBSYS_12071565&REV_01


5. In the text above the Vendor ID and Device ID will always be in the same place for the driver Vendor ID = 1106 and Device ID = 3371 your numbers will be different.

6. Once you have obtained both the IDs, proceed to PCI Database.com. There you can either search for the vendor from the vendor ID or directly get information about the device along with the vendor name by searching with the device ID.

7. Then, I proceed with entering the Vendor ID and Device ID, click on Search and here is the result:

Vendor ID


Device ID


8. So, in Vendor ID it stated that my device is from VIA Technology and in Device ID of course it's VIA Chrome9 HC IGP even a few results came up with the same ID. Next thing is just click on the link given and download the appropriate driver.

The result is correct.

This will really help for those who downgraded their PC/Laptop's from default Windows Vista to Windows XP because Windows XP did not came with a bundle of up-to-date drivers for a new hardware's like Windows Vista/7 does included in the setup installer.

Tutorial On How To Download Files From Torrent Sites Without Having To Install Any Torrent Client Software In Your Computer


It's been a while I'm not posting any tutorial articles, but today, here is a new one and I hope you all will like it.

Torrent is the most popular way of downloading large files, including movies and games. Downloading with a torrent is advantageous especially when downloading files, which are momentarily very popular and whitch lots of people are downloading. Because the more people download the file, the higher speed for everyone.

You'll need to install a torrent client software in your computer such as BitTorrent, uTorrent and etc. to start downloading any files from torrent that you wanted. But, for whom who doesn't want to cloaking their computer with these torrent software or have experiencing something bad about it before but you really need the files that only available on torrent site, here's the tutorial for that ...

Let's begin:

1. Browse to this site: http://www.torrent2exe.com/ , you got two options there, if you have a link to a torrent files, just use the first column ("Enter URL of the torrent file") or if you have download the torrent file to your computer, click on "Browse" button and insert the file. Then, choose the second radio button ("Normal size, no additional download will be required") and click on "Start download!" button. Save the converted file onto your Desktop.


2. Double click the converted file that you've just download (xxxxxx.exe - according to torrent file name) to run it. If you're using Windows Vista or Windows 7, you need to run it as administrator.


3. The warning dialog box appear to remind you that you have to allow the application (the xxxxxx.exe) in Firewall. Don't worry, just click "OK".


4. Just click "Allow access" on Firewall dialog box.


5. Now, it's start downloading. As you can see, all the torrent functions are available like Pause, Start (Resume), continue after system restart, shows you how many connections, seeds and everything.


6. Yey !!! The download completed. Click on "Close" and your downloaded file/s can be found on Desktop (if you launched the downloader from Desktop).


7. Click the downloader icon (xxxxxx.exe) on Taskbar Tray (Notification Area), click "Stop and exit".


8. Next, nevermind the warning, just click "OK".


Yes, you've got the file/s that you wanted, you can delete the "xxxxxx.exe" file because you don't need it anymore. If you want to download another file/s, please start again from the first step.

Now, it's time to cleanup. Cleanup !!! ? Yes. Is it wrote something or left something in your computer ? The answer is, Yes. Here is what the application (xxxxxx.exe) left behind and things to remove:

1. In Firewall "Allow a program through Windows Firewall", just remove the "xxxxxx.exe" entry.


2. In Windows Registry, navigate to HKEY_CURRENT_USER\Software\ and you'll found "Torrent2Exe.com" folder. Right click on it and delete.


Or you can just copy and paste below text into Notepad, save it as "anything.reg" (without quotations), choose save file type as "All files" and save it to your Desktop. Double click to run it and the "Torrent2Exe.com" registry entry will be deleted.

============================================================

Windows Registry Editor Version 5.00

[-HKEY_CURRENT_USER\Software\Torrent2Exe.com]

============================================================

So, that's it. Happy Torrenting !!!

Get Genuine Lifetime License Of USB Safely Remove 4.1 For Free


This is an official giveaway by safelyremove.com which will run during the week of August 19th – 25th, 2009 only. So, hurry up to get your free license!

USB Safely Remove is a USB device manager. It saves time and extends user abilities on active work with flash-drives, portable drives, card readers and other gadgets.


USB Safely Remove 4.1 supports: Win 2000\XP\2003\Vista, 32\64 bit.

To get your free license:

1. Go to: http://safelyremove.com/giveawayweeka9.htm.

2. Enter your full name and email address, then click on ‘I want the License!’

3. Then you’ll receive an email along with the registration name & code to activate your product. To activate, click on "Help|Enter License Key..." on USB Safely Remove menu after the installation finished.

That's it. It's easy as 1, 2, 3.

Btw, the download link for the product included in the email that you received or, you can download the latest version (4.1.5.806) from here: http://safelyremove.com/usbsafelyremovesetup.exe

Note: Please remember that, this license is for a lifetime usage of 4.1 version only. If you plan to upgrade, you have to purchase another license.

Get F-Secure Internet Security 2009 Genuine License And Use It To 2010 Version Free For 3 Months ... Or Even More !!!


This promotional is directly from F-Secure website but was set by CHIP Magazine for German people, with more but, we can also get this offer. It's for F-Secure Internet Security 2009, even more but, the license key also valid for 2010 version.

F-Secure® Internet Security™ keeps you and your family safe on the Internet. It protects your data and privacy when you send e-mail, download music, bank, shop or play online.

Internet Security provides complete protection against online threats with powerful detection and removal of all types of malicious software. Automatic updates and advanced DeepGuard™ 2.0 cloud computing technology ensure the fastest protection against new threats. This comprehensive security package also includes a firewall, spam control, rootkit detection and parental control.

Here is how to get the 3 months license:

1. Visit this Promotional Page, fill in the form according to image shown below and click "Daten senden".


2. You will receive an email from F-Secure Shop enclosed with license key. License key will be highlighted in big letters with yellow color background and some thing like this “Ihr persönlicher Freischalt-Code lautet:” will be written above the license key.

3. Download F-Secure Internet Security 2010 from HERE or from the official F-Secure site, HERE.

4. Install F-secure Internet security and if you can't run the trial period, use the license key to activate it for 90 days.

Note: If the installer is in German, change it to English during installation.

Good News: After 3months, the license can be extended further 3 months and still 2 more times. Uninstall and reinstall F-Secure Internet Security then key in the same license key again could do the tricks. So that you can get free 12 months license, but not really sure about this and you could try it.

Download, Install And Use Panda Internet Security 2010 Free For 3 Months


Web of Trust (Wot) in partnership with Panda is giving 3 months of Panda Internet Security 2010 to all WOT members for free. Even you're not a member of WOT, you still can get this giveaway.

Panda Internet Security 2010 is a security suite that lets you use the Internet with complete peace of mind. It protects you from viruses, spyware, rootkits, hackers, online fraud, identity theft and all other Internet threats. The anti-spam engine will keep your inbox free from junk mail while the Parental Control feature ensures your children can use the Web safely. And thanks to the new Collective Intelligence technology, the solution is now much faster than previous versions.

Data Sheet:
Technical Requirement:

Operating System:
- Windows XP 32-bit
- Windows Vista 32 and 64-bit
Processor:
- Pentium 300 MHz or faster
RAM:
- 128 MB without TruPrevent
- 512 MB with TruPrevent (1 GB recommended)
Hard Disk:
- 275 MB free space

Download, install and use 3 months of Panda Internet Security 2010 for free from here: http://www.mywot.com/en/panda/internetsecurity

Note: No serial key needed, just install and use.

Customizing Windows Vista & Windows 7 OEM Information Manually


We all know how to add an OEM information in System Properties under Windows XP. There are OEMLogo.bmp (96x96) for OEMLOGO and OEMInfo.ini for OEM information used to add both files under X:\Windows\System32\

But In Windows Vista and Windows 7, has been changed the method to add OEM information in System Properties. All things are added through Windows registry instead of using the OEMinfo.ini file.

Here is the example:


As you can see, you can add a little bit more information like Manufacturer, Model, OEM logo and a few others.

Just simply create below registry entry. Edit the information (marked in RED) according to your system specifications.
Windows Registry Editor Version 5.00

[HKEY_LOCAL_MACHINE\SOFTWARE\Microsoft\Windows\CurrentVersion\OEMInformation]
"Manufacturer"="BIOSTAR Group"
"Model"="P4M900-M7 FE"
"Logo"="C:\Windows\system32\oemlogo.bmp"
"SupportURL"="http://www.biostar.com.tw/app/en/"
"SupportPhone"="Tel: 886-2-2218-0150 / Fax: 886-2-2218-1552"
"SupportHours"="9 AM to 9 PM (Mon-Sat)"
Or you can also create a registry file using Notepad, save it as anything .reg and merge it into Windows Registry.


And then, for the OEM logo, choose any logo that you like in BMP format with the maximum size is 120x120 pixels and 24-bit of color depth. Copy and paste the logo into X:\Windows\System32\ (X is where you installed Vista/7, normally is in drive C).

After that, refresh Windows Explorer (right click -> Refresh, in open space at Desktop), open System Information to see the result .. that's it.

Free 1 Year Dr.Web Anti-Virus 5 Genuine License


Key Features:
  • Detection and neutralization of malware on hard drives, removable data storage devices and in RAM
  • Real-time interception of calls to files on hard and floppy drives, CD/DVD/Blue-ray/Flash drives, and smart cards
  • Detection of viruses placed in an archive at any nesting level
  • New! The FLY-CODE technology allows checking files compressed by unknown packers
  • Protection against unknown threats powered by non-signature detection technology Origins Tracing™ and the intelligent heuristic analyzer
  • Protection against mass mailings performed by a mail worm from an infected machine
  • Protection of account information related to online games, social networks, electronic money systems, credit card numbers and PIN codes
  • Detection of spam-bots
  • Virus scan of SMTP/POP3/NNTP/IMAP traffic
  • On demand/scheduled scan
  • Individual scan schedules
  • Automatic updating
Today you are going to get Dr.Web Anti-Virus 5 genuine license 1 year for free, this promotion runs by a Chinese website.

Here is how to grab a free Dr.Web Anti-Virus 5 license:
Step 1

First, visit this promotional page: http://www.drweb.com.cn/other/frdrweb.aspx and follow below steps:

A. Now Just click the icon as shown in below image


B. You will be forwarded to next page, fill the form as shown in below image, at occupation choose anything and click "Click Here" button.

Note: If you have errors when submitting the form, please use Gmail account.


C. Now you’ll be forwarded to next page , just follow below image


D. And you'll get the confirmation of registration like below image


Step2

Check your mailbox, you will instantly receive a license key from public@drweb.com.cn

Step3

Now, download the installation file from this link: ftp://ftp.drweb.com/pub/drweb/windows/drweb-500-win.exe and install it.

Step 4

During the installation, check on “Receive key file During Installation” option, afterwards, click on “Obtain a License key file” icon and enter your license key, That’s it.
Dr.Web Anti-Virus 5 supports Windows 2000/XP/Vista (32-bit only). If you're using Windows 7, please use the Beta version that is free by register yourself on this site: http://beta.drweb.com/registration/

Increase DNS Cache In Windows Vista / Windows 7 For Faster Web Browsing


Whenever you go to a website, Windows DNS Cache has to look up the IP address where that website is located. First it checks to see if it’s in your cache before asking the DNS server over the Internet for the IP address.The cache contains both negative and positive entries.

Positive entries are those in which the DNS lookup succeeded and you were able to connect to the Web site. When Windows looks in the cache, if it finds a positive entry, it immediately uses that DNS information and sends you to the requested Web site.

Negative entries are those in which no match was found, and you end up getting a “Cannot find server or DNS” error in your browser. Similarly, when Windows looks in the cache and finds a negative entry, it gives you the error message without bothering to go out to the site.Negative entries can lead to problems. When you try to make a connection to a site that has a negative entry in your cache, you’ll get an error message, even if the site’s problems have been resolved and it’s now reachable.

The items in the cache do not stay there forever, and are constantly making room for more recent addresses you visited. Increasing the size of the DNS cache in Windows Vista and Windows 7 will allow for faster web browsing, especially if you frequently view the same websites. Edit some registry values to achieve this.

Here's how:
  • Click on Start -> choose Run -> type in regedit -> press ENTER.
  • Locate and then expand the following registry subkey:
HKEY_LOCAL_MACHINE\SYSTEM\CurrentControlSet\Services\Dnscache\Parameters
  • Go to New > DWORD (32-bit) Value.
  • Name it as CacheHashTableBucketSize
  • Double-click into it and enter the value 1 (in Decimal)
  • Also create the following DWORD values with the following values also in Decimal:
NegativeCacheTime = 0
CacheHashTableSize = 384
MaxCacheEntryTtlLimit = 64000
MaxSOACacheEntryTtlLimit = 301

To make the changes to take effect, flush your Windows DNS cache by issuing the command ipconfig /flushdns at an elevated command prompt (run CMD as administrator). The command will flush your DNS cache — all the entries, both positive and negative, will be flushed — and it will be empty until you start visiting Web sites.

Restart your computer for the changes.

Here is the example on "DNS Cache Parameters" in registry looks like after above tweaks been done.


To undo the tweaks, just delete all those registry keys that you've created and restart your computer.

It works flawlessly in Windows Vista and 7, but you could try this on Windows XP too to see if it work.