Showing posts with label Tutorials. Show all posts

How To Benchmark The Fastest DNS Server From Your Location


We have talked about several alternatives to replace the DNS addresses provided by our ISP. Many interesting comments and recommendations comes from users around the internet.

But did you know, if the DNS server located too far from where you live, it will make your internet speed become worse. Although the reputations of that DNS provider very excellent and had a great achievements, it will not be able to improve the situation.

So, in today's article, I will show you how to specify a DNS server which is the fastest to use based on where you live and thus you can improve your internet speed.

Steve Gibson from grc.com has develop a small portable utility called 'DNS Benchmark', a unique, comprehensive, accurate and free Windows (and Linux/Wine) utility to determine the exact performance of local and remote DNS nameservers.

In this test I have setup DNS addresses into my computer with Google Public DNS and let's see how to perform this and what the result is.

Restore Default Network Name In Windows 7


I don't know the exact title should I put, I hope the title above is correct and relevant to the following articles. Last night, I have plugged my computer with a spare ADSL modem because the modem that I usually use went a little bit dizzy on connections lately.

Once finished with the configuration, I went to 'Network and Sharing Center' to check the status of connection, I noticed that the network name has changed and listed with a number. Seems like, when I plug in another ADSL modem, Windows will register it as a new network.


Yes, I can rename it with any names but not to the default name which is 'Network' (without the number next to it). The 'Network' name has been registered to my previous ADSL modem and I can only rename this connection with the name other than 'Network'.

Here is what I did to get back the default name:

How To Find Drivers For Unknown Devices In Windows


Usually, when you buy any hardware, the drivers come along with it on a disc. If you lost the driver disc you can always download the necessary drivers from the manufacturer's website. But what do you do when you are not sure of the manufacturer of the hardware? When you open Device Manager properties, a few device with big yellow question mark listed and labeled as "Unknown Devices".

Besides of using some software's such as Driver Detective, Unknown Device Identifier and so on to trace down the "Unknown Devices" ID and search an appropriate drivers for you through internet, here's the another and easy way to identify also helps you to download the drivers for it.

PCIDatabase.com served a big database of PCI device IDs information about either the vendor itself or the devices manufacture. For that, I ran a test on a device with well installed driver from my PC to see what this site can do and what it can give or it will produce a wrong answers. Here's the test and way to do it.

1. Open Device Manager (Control Panel > System > Hardware > Device Manager) or just right click on My Computer (or Computer in Windows Vista/7) > Properties > Hardware Device Manager (or in Windows Vista/7, just click on Device Manager after Properties).

2. The hardware which drivers are missing will appear as "Unknown Device" and normally with a yellow question mark beside it, so it's easier to locate the device. Right click on the "Unknown Device" and click on Properties.

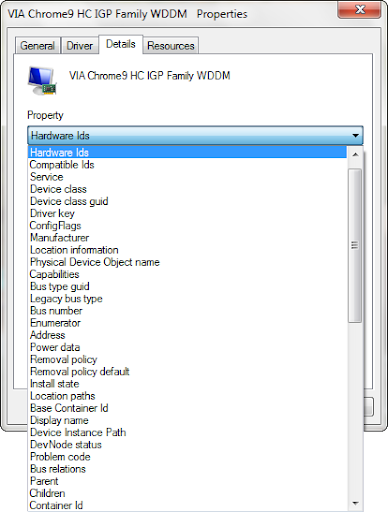
3. Under the Properties window > click on Details tab and select Device Instance Id or Hardware Ids in Windows Vista/7 from the drop down box.


4. You should see a code similar to this (but, in here is my test hardware ID):

PCI\VEN_1106&DEV_3371&SUBSYS_12071565&REV_01


5. In the text above the Vendor ID and Device ID will always be in the same place for the driver Vendor ID = 1106 and Device ID = 3371 your numbers will be different.

6. Once you have obtained both the IDs, proceed to PCI Database.com. There you can either search for the vendor from the vendor ID or directly get information about the device along with the vendor name by searching with the device ID.

7. Then, I proceed with entering the Vendor ID and Device ID, click on Search and here is the result:

Vendor ID


Device ID


8. So, in Vendor ID it stated that my device is from VIA Technology and in Device ID of course it's VIA Chrome9 HC IGP even a few results came up with the same ID. Next thing is just click on the link given and download the appropriate driver.

The result is correct.

This will really help for those who downgraded their PC/Laptop's from default Windows Vista to Windows XP because Windows XP did not came with a bundle of up-to-date drivers for a new hardware's like Windows Vista/7 does included in the setup installer.

Tutorial On How To Download Files From Torrent Sites Without Having To Install Any Torrent Client Software In Your Computer


It's been a while I'm not posting any tutorial articles, but today, here is a new one and I hope you all will like it.

Torrent is the most popular way of downloading large files, including movies and games. Downloading with a torrent is advantageous especially when downloading files, which are momentarily very popular and whitch lots of people are downloading. Because the more people download the file, the higher speed for everyone.

You'll need to install a torrent client software in your computer such as BitTorrent, uTorrent and etc. to start downloading any files from torrent that you wanted. But, for whom who doesn't want to cloaking their computer with these torrent software or have experiencing something bad about it before but you really need the files that only available on torrent site, here's the tutorial for that ...

Let's begin:

1. Browse to this site: http://www.torrent2exe.com/ , you got two options there, if you have a link to a torrent files, just use the first column ("Enter URL of the torrent file") or if you have download the torrent file to your computer, click on "Browse" button and insert the file. Then, choose the second radio button ("Normal size, no additional download will be required") and click on "Start download!" button. Save the converted file onto your Desktop.


2. Double click the converted file that you've just download (xxxxxx.exe - according to torrent file name) to run it. If you're using Windows Vista or Windows 7, you need to run it as administrator.


3. The warning dialog box appear to remind you that you have to allow the application (the xxxxxx.exe) in Firewall. Don't worry, just click "OK".


4. Just click "Allow access" on Firewall dialog box.


5. Now, it's start downloading. As you can see, all the torrent functions are available like Pause, Start (Resume), continue after system restart, shows you how many connections, seeds and everything.


6. Yey !!! The download completed. Click on "Close" and your downloaded file/s can be found on Desktop (if you launched the downloader from Desktop).


7. Click the downloader icon (xxxxxx.exe) on Taskbar Tray (Notification Area), click "Stop and exit".


8. Next, nevermind the warning, just click "OK".


Yes, you've got the file/s that you wanted, you can delete the "xxxxxx.exe" file because you don't need it anymore. If you want to download another file/s, please start again from the first step.

Now, it's time to cleanup. Cleanup !!! ? Yes. Is it wrote something or left something in your computer ? The answer is, Yes. Here is what the application (xxxxxx.exe) left behind and things to remove:

1. In Firewall "Allow a program through Windows Firewall", just remove the "xxxxxx.exe" entry.


2. In Windows Registry, navigate to HKEY_CURRENT_USER\Software\ and you'll found "Torrent2Exe.com" folder. Right click on it and delete.


Or you can just copy and paste below text into Notepad, save it as "anything.reg" (without quotations), choose save file type as "All files" and save it to your Desktop. Double click to run it and the "Torrent2Exe.com" registry entry will be deleted.

============================================================

Windows Registry Editor Version 5.00

[-HKEY_CURRENT_USER\Software\Torrent2Exe.com]

============================================================

So, that's it. Happy Torrenting !!!

Increase DNS Cache In Windows Vista / Windows 7 For Faster Web Browsing


Whenever you go to a website, Windows DNS Cache has to look up the IP address where that website is located. First it checks to see if it’s in your cache before asking the DNS server over the Internet for the IP address.The cache contains both negative and positive entries.

Positive entries are those in which the DNS lookup succeeded and you were able to connect to the Web site. When Windows looks in the cache, if it finds a positive entry, it immediately uses that DNS information and sends you to the requested Web site.

Negative entries are those in which no match was found, and you end up getting a “Cannot find server or DNS” error in your browser. Similarly, when Windows looks in the cache and finds a negative entry, it gives you the error message without bothering to go out to the site.Negative entries can lead to problems. When you try to make a connection to a site that has a negative entry in your cache, you’ll get an error message, even if the site’s problems have been resolved and it’s now reachable.

The items in the cache do not stay there forever, and are constantly making room for more recent addresses you visited. Increasing the size of the DNS cache in Windows Vista and Windows 7 will allow for faster web browsing, especially if you frequently view the same websites. Edit some registry values to achieve this.

Here's how:
  • Click on Start -> choose Run -> type in regedit -> press ENTER.
  • Locate and then expand the following registry subkey:
HKEY_LOCAL_MACHINE\SYSTEM\CurrentControlSet\Services\Dnscache\Parameters
  • Go to New > DWORD (32-bit) Value.
  • Name it as CacheHashTableBucketSize
  • Double-click into it and enter the value 1 (in Decimal)
  • Also create the following DWORD values with the following values also in Decimal:
NegativeCacheTime = 0
CacheHashTableSize = 384
MaxCacheEntryTtlLimit = 64000
MaxSOACacheEntryTtlLimit = 301

To make the changes to take effect, flush your Windows DNS cache by issuing the command ipconfig /flushdns at an elevated command prompt (run CMD as administrator). The command will flush your DNS cache — all the entries, both positive and negative, will be flushed — and it will be empty until you start visiting Web sites.

Restart your computer for the changes.

Here is the example on "DNS Cache Parameters" in registry looks like after above tweaks been done.


To undo the tweaks, just delete all those registry keys that you've created and restart your computer.

It works flawlessly in Windows Vista and 7, but you could try this on Windows XP too to see if it work.

10 Best Mozilla Firefox about:config Tweaks


I only using two kinds of web browser, Mozilla Firefox and Internet Explorer. Internet Explorer is a good default web browser for Windows, but, since it hard to tweaks and lack of customization functions, I switched to Mozilla Firefox that much easier and faster too.

I did not having a hard time arguing on memory usage made by Firefox like most of users had, the thing is, please install CleanMem to manage the famous "Firefox memory leakage", yes, CleanMem does the job, Firefox only took ± 20MB of RAM after 2 hours surfing on my low specs. PC with 1 MB of RAM and Windows 7 installed.

The point is, we are not talking about Firefox resource usage here but it's only a little bit of "commercial break" .. haha!! .. Ok, from a various tutorial on tweaking Firefox "about:config", here is the best 10 tweaks that you can use for a various function on Firefox.

1: Speed up Firefox

This hack requires a few steps. Search for pipelining in the filter and you should see:

network.http.pipelining: Change this to true.
network.http.proxy.pipelining: Change this to true.
network.http.pipelining.maxrequests: Change this to 8.

Now search for max-connections and you should see:

network.http.max-connections: Change this to 96.
network.http.max-connections-per-server: Change this to 32.

2: Disable antivirus scanning

This is only for the Windows version. If you're downloading large files, this scanning can seriously slow things down. And since you will most likely scan the downloaded file anyway, you'll probably want to disable this. Of course, if you are uber paranoid (not a bad trait for computing), you might want to leave this entry alone.

To disable antivirus scanning, search for scanWhenDone and you should see:

browser.download.manager.scanWhenDone: Change this to false.

3: Open Javascript popups as tabs

If a popup window lacks the features of a browser window, Firefox will handle it like a popup. If you would prefer to open all windows, including popups, as new tabs, you need to tell Firefox in about:config. Search for newwindow and you will see three entries. Of those three entries, you will want to modify:

browser.link.open_newwindow.restriction: Change this to 0.

4: Spell check in all fields

By default, Firefox checks spelling only in multiple-line text boxes. You can set it to check spelling in all text boxes. Search for spellcheckdefault and you should see:

layout.spellcheckDefault: Change this to 2.

5: Open search bar results in new tab

When you use the search bar, the results display in the current tab. This can be a nuisance because you will navigate out of the page you're currently in. To make sure Firefox always opens search results in a new tab, search for openintab and you should see:

browser.search.openintab: Change this to true.

6: Auto-export bookmarks

In Firefox 3, bookmarks are automatically saved and exported for you. The only problem is that by default, they're saved as places.sqlite instead of the more convenient bookmarks.html. To change this setting so that they can be easily re-imported, search for autoExportHTML and you should see:

browser.bookmarks.autoExportHTML: Change this to true.

7: Disable extension install delay

One of the few gripes I have with Firefox is the silly countdown you must endure every time you want to install an extension. Fortunately, this can be disabled. Search for enable_delay and you should see:

security.dialog_enable_delay: Change this to 0.

8: View source code in an external editor

When you need to view the source of a page, it opens up in browser popup. Most developers would probably like to have that opened in their favorite editor instead of having to cut and paset. To do this, there are two entries to modify. Search for view_source.editor and you will see:

view_source.editor.external: Change this to true.
view_source.editor.path: Change this to the explicit path to your editor of choice.

9: Get more add-on search results

When you do a search in the Add-on window, you'll see just five results. You might find it more efficient to increase this number. Search for getAddons and you should see:

extension.getAddons.maxResults: Change this to 10 (or higher, if you want to see even more).

10: Redefine the Backspace button

Did you know you can configure Firefox to use the backspace button to either go back a page or go up a page? This keeps power users from having to go back and forth from the keyboard to the mouse. Search for backspace and you will see:

browser.backspace_action: Change this to 0 for previous page and 1 for page up.

There you go, the 10 best tweaks (I thought so), happy tweaking and enjoy your new tweaked Mozilla Firefox ..

How to Uninstall/Remove Office 2007 SP2 With Office 2007 SP2 Uninstall Tool


Many users would have already installed Sp2 for Microsoft office 2007. Office 2007 Service Pack 2 is expected to boost performance but it may not the case for you. You may find various issues after installing office 2007 sp2.

If you are looking for way to uninstall and remove office 2007 Service pack 2 then here is Office 2007 Service Pack 2 Uninstall tool provided by Microsoft. This is official tool to uninstall and remove Service pack 2. The 2007 Office SP Uninstall Tool is designed to uninstall all the patches associated with Office 2007 SP2.

How to Uninstall and Remove Office 2007 Service Pack 2
1. Download Office 2007 SP2 Uninstall tool
2. Double Click on office2007spuninstall.exe. Accept the terms and click Continue.
3. Make a new folder called oarpman at the root of C drive and click OK.


4. Now Press win+r and type cmd at run command. For Windows Vista and Windows 7 Click Start > All Programs > Accessories. Right-click Command Prompt and click “Run as Administrator”
5. OARPMAN needs a release name to start the uninstall. To get it, type the following in your command prompt window: c:\oarpman\oarpman.exe /report and press Enter.


6. To start the uninstall of SP2 type the following in your command prompt window: c:\oarpman\oarpman.exe /remove O12SP2 (replace O12SP2 with your release name) and press Enter. This process may take some time to complete.

That’s it. Service Pack 2 is uninstalled, and Office 2007 is reverted back to a patch state prior to SP2 being installed.

Thanks to SANDIP for this tutorial.

How To Block/Unblock Any Website Easily


If you're worries about your kids or friends using your computer and surfing through the unsafe or unhealthy websites (porn sites actually) that could bring problems such as your computer might get Malware/Virus infections or to stop kids from watching things that they not suppose to, here's the easy way to prevent that.

To archive this, you must know the websites address that you want to block and the simple way you can get it is by looking at the Internet History or Cookies (if it's not been delete yet), or using any 3rd party software that could retrieve the addresses, or you could do a System Restore to get that.

We're not going to use any software or modify the modem/router settings, but in this tutorial we will edit the Windows Hosts file, that's why I said "easily".

Here's to begin:
1. Go to C:\Windows\System32\drivers\etc (applies to XP, Vista & 7) and find the file named Hosts (without extensions).
2. Right click on it, choose Properties and untick the "Read Only" attributes, click Apply and OK.
3. Double click the Hosts file and choose the program to open and choose Notepad.

This image from Windows Vista (similar to Windows 7).

And this is from Windows XP.

4. All you have to do is type in the website address that you want to block on the next line to localhost. Begin with 127.o.o.1 and follow with the address. See example in image below.


5. Put as many website address as you like, after done that click File, click Save (not Save as) and Exit.
6. Right click on Hosts file that you've just edit, choose Properties and change "Read Only" attribute to enabled back.
7. Reboot your computer for changes to take effect.
That's it, do some test after that, try surf to websites that you've just block. And to reverse the changes (to unblock), just delete the address that you've put before in Hosts file.

Note: For Windows Vista and Windows 7, if you have a difficulties when trying to edit or saving the Hosts file, "Take Ownership" on Hosts file first before you begin (from step 1). Learn how here.

Summary:

127.0.0.1 is a localhost, when users want to surf into the address that you've set into the Hosts file, the OS (your computer) will redirect the address to localhost,it's mean back into OS (your computer), not connecting to the website address.So, the error or failed to connect occurs, this is called IP Mapping.

How To Slipstream Or Intergrate Microsoft Office 2007 Service Pack 2 (SP2)


Microsoft Office 2007 has received two service packs (Office 2007 SP1 and Office 2007 SP2) up till now. Service packs contain important stability, reliability, performance and security improvements, and include all updates released till service pack is finalized.

The integrated Office 2007 installation ISO image or disc helps save update installation time after installing Office 2007 RTM or SP1 (for SP2), and ensure that the newer SP is installed.

Microsoft Office 2007 setup program will install any new updates that found inside the Updates folder in the installation media. The updates must be in .msp file format (MSP or Windows Installer Patch) in order to be recognized during setup installation process.

Follow the steps below in order to slipstream and integrate Office 2007 SP2 into original Office 2007 RTM (or with SP1) installation files.
1. Extract and copy the contents of the Office 2007 SP1 (or RTM) image or disc to a temporary folder.

For example, C:\Office2007

2. Download and copy the Office 2007 SP2 Update file to another temporary folder.

For example, C:\Office2007SP2

3. Open a command prompt, and run the following command to retrieve and get the Office 2007 SP update MSP, (choose "run as administrator" if you use Windows Vista or Windows 7):

C:\Office2007SP2\office2007sp2-kb953195-fullfile-en-us.exe /extract:C:\Office2007\Updates\

Note: The drive letters and folder names names may vary according to your own preferences.


4. Accept the Microsoft Software License Terms to start integrating the service pack to Office 2007 installation files. The process will expand several .msp files to “Updates” folder.


5. Optionally, uses disc image manipulation programs to re-create a fresh Office 2007 SP2 ISO image, or burn the Office 2007 SP2 installation files inside C:\Office2007 folder to a disc media with disk burning software.
The setup for Office 2007 will now automatically apply updates for SP2 during instalation.

How To Totally Uninstall Any Antivirus Program


I've been asked by my chat friend recently on how to install another antivirus product after uninstall another one. He says, "why I cannot install Kaspersky Antivirus after I uninstall ESET NOD32 Antivirus, the pop up appears and says my computer has already install another antivirus program". Well, I took a time to think about it because ESET products doesn't have that kind of uninstalling problems before, not like other antivirus program such as Kaspersky, AVG or McAfee.

Even the antivirus company did released their removal tool to help uninstall their programs completely, you need to have an extra procedure to make it perfect. Here's how the problem was solved and I think you could apply these steps to other antivirus too such as I've mentioned above.

If you're already uninstall the antivirus that gave problems to you, just reinstall it back and follow the steps to uninstall, and for this tutorial, I'll be using ESET NOD32 refer to my friend solutions.
Uninstall
1. Right click on ESET NOD32 icon at Taskbar Tray, click to disable the 'Realtime Protections'.

2. Click Start > Run > type-in services.msc > Ok
3. At Services, find all services related to ESET, double click it, click the dropdown menu at startup type and click disable, click Apply and Ok. Do that to all ESET services that you've found.

4. Right click on empty space at Taskbar and choose Start Task Manager.
5. At Task manager window, click Processes tab > click Show processes from all user that located at the bottom of Task Manager window, find all processes related to ESET, highlight it and click End Process.

6. Now, you can start uninstall ESET NOD32 Antivirus from Add or Remove Programs or from Start menu. Reboot your computer after uninstall complete.

Using Removal Tool

1. After computer restart, double click the NOD32 Removal Tool to run it and follow the removal instructions. If you are using Windows Vista or Windows 7, please right click the tool and choose "Run as administrator".
2. Reboot again for changes to take effect.

Clean Extra Leftovers
1. Click start > Run > type-in regedit > Ok
2. At Registry Editor Tool, click Edit > Find > and type-in ESET > click Find Next, delete all related registry strings related to ESET. You must do a registry backup first before making any registry deletions. Or you can use other tools that easily find a registry strings such as RegSeeker.

3. Using Windows Search, search the files and folders related to ESET, still by using ESET as keyword, delete all that found but make sure search for hidden files and folders are enabled.
4. Reboot again.
Now, you can start installing your new antivirus program. And by following these, my friend managed to install his Kaspersky Antivirus.

Why these step made it works? When you uninstall without kill all running services and processes, the uninstaller doesn't have much ability to uninstall completely, so, that's why the leftovers from unperfect uninstallations still running in your computer.

As I've mentioned before, you can try to apply these trick to other antivirus program, I think it works too.

You can download all available Antivirus Removal Tools here:

Avast:

http://files.avast.com/files/eng/aswclear.exe
AVG:
www.avg.com/download-tools
BitDefender:

http://kb.bitdefender.com/KB333-en--How-to-uninstall-BitDefender.html
CA:

http://homeofficekb.ca.com/CIDocument.asp?KDId=3125&Preview=0&Return=0&GUID=DF325E0AA0AB4264AF47E4BEA49F571B
F-Secure:

http://support.f-secure.com/enu/corporate/downloads/removeav.shtml
Kaspersky:

http://usa.kaspersky.com/support/home-support.php?selected_faq_id=193239348&selected_product_id=176492845&selected_topic_id=176492916
McAfee:

http://download.mcafee.com/products/licensed/cust_support_patches/MCPR.exe
Panda:

http://www.pandasecurity.com/resources/sop/UNINSTALLER_08.exe
Symantec (Norton):
http://solutions.symantec.com/sdccommon/asp/symcu...

Trend Micro:
http://esupport.trendmicro.com/support/viewxml.do?ContentID=EN-1033129
ESET:
http://www.nod32.nl/download/tool/nod32removal.exe

Ok, That's it, best of luck ..

Update ESET NOD32 Antivirus Manually (Offline)


ESET NOD32 Antivirus is one of the best antivirus program available, but when it comes into updates virus definitions, sometimes it becomes one of the worse especially after installing a new version or upgrading.

I experiencing myself recently, after installing NOD32 V4, updates major database signature failed over and over again for about 3 days. 3 days I surfed internet with NOD32 signature outdated, it's horrible!

So, what to do? I thought it's better update it manually, but where to get the virus signature files? After searching through internet, I've found the source files and here's how to update it manually (offline).You could use this updates if you don't have internet connections or somehow your license expired (I guess?)

We are going to use the virus definition database signature 3rd March 2009 released, it's okay to use a few days older files, after install it, the daily or minor automatic updates will become easier and normal again. Let's get started ...
1. Download the virus database signature files 20090303

Download n32_vsdu_20090303_part1.rar
Download n32_vsdu_20090303_part2.rar
Download n32_vsdu_20090303_part3.rar
Download n32_vsdu_20090303_part4.rar

2. Extract part 1 on Desktop, four parts will automatically extract.
3. Right click on the extracted folder and choose properties.
4. Copy and paste the text links (refer below image) into Notepad.


5. And in Notepad, arrange the text like below image and "Your Name" is your computer name, leave it default.


6. Minimize the Notepad window, we are going to use it later. Double-click on NOD32 icon at Taskbar tray to open the main window.


7. At NOD32 main window, click on "setup" and then click "Enter entire advanced setup tree...".


8. At setup window, click "update".


9. At right side of setup window, click "Edit".


10. Now, copy from Notepad the link you create earlier and paste into "update server", click "Add", click "Ok" and "Ok" again.


11. Go to NOD32 main window, click update and click the update link at right side column.


12. The update takes only a seconds and you should update NOD32 successfully.


13. Go back to "update server", delete the link that you created by click on link once, click "Remove", click "Ok" and click "Ok" again. Now click "update" and update to the newest database signature.
Easy isn't it, I will update the virus signature files next time if I'm getting a request for it or if new source files available.